
Transforming your WordPress site into an automated sales and support powerhouse is now easier than ever with IntelliAgent AI. Version 1.6 introduces a streamlined interface and powerful integrations that allow you to deploy a 24/7 digital employee capable of recommending products, answering questions, and guiding customers to purchase. This guide provides a comprehensive walkthrough of the entire setup process, ensuring you can launch your AI agent in minutes.
Whether you run a complex WooCommerce store or a content-driven website, properly configuring IntelliAgent AI is the key to unlocking its full potential. We’ll cover everything from initial activation to advanced customization, providing a clear, step-by-step path to automating customer engagement and driving revenue.
Table of Contents
- The Correct IntelliAgent AI Setup Flow
- Step 1: License Activation
- Step 2: AI Engine & API Key Configuration
- Step 3: Website & WooCommerce Sync
- Step 4: Defining Your AI Persona
- Advanced Customization and Training
- Key Settings Summary Table
- Frequently Asked Questions
The Correct IntelliAgent AI Setup Flow
A successful launch of your AI agent depends on following a specific sequence of steps. This ensures that each component is configured correctly before the next one is initiated. Attempting these steps out of order can lead to configuration issues or an agent that doesn’t have the right knowledge to perform effectively.
The mandatory setup sequence is: License Activation → AI Engine Configuration → Website & Store Sync → AI Persona Definition. Following this order is critical for a smooth deployment.
This flow is designed to build your AI agent from the ground up, starting with authentication, connecting its reasoning brain, feeding it knowledge, and finally, giving it a personality. We will now break down each of these four core steps in detail.
Step 1: License Activation
License activation is the first and most crucial step, as it authenticates your copy of the plugin and unlocks the professional features and communication with Large Language Models (LLMs). Without an active license, the core intelligence engine remains disabled.
To activate your license, navigate to the IntelliAgent AI → License tab in your WordPress dashboard. Here, you will find a field to enter the license key you received upon purchase. Paste your key and click the “Activate License” button. Upon successful validation, the status will change to “Active,” confirming that your lifetime ownership is verified and the plugin is fully operational.
Step 2: AI Engine & API Key Configuration
The AI Engine configuration is where you connect IntelliAgent AI to its brain. This is done in the AI Engine tab. Version 1.6 provides a future-proof infrastructure by supporting multiple leading AI providers, including Grok (xAI), OpenAI, and Google Gemini.
This multi-model support offers significant advantages:
- Flexibility: You can switch between AI providers at any time to balance performance, cost, and reasoning capabilities based on your specific needs.
- Cost Control: Different models come with different pricing. This flexibility allows you to choose the most cost-effective option for your traffic levels.
- Performance: You can leverage the latest and most advanced flagship models from each provider, ensuring your AI agent has access to state-of-the-art conversational logic and sales reasoning.
To connect an engine, simply select your preferred provider from the dropdown menu and enter your corresponding API key. This key establishes a secure connection that enables real-time conversational reasoning between your website and the AI model.
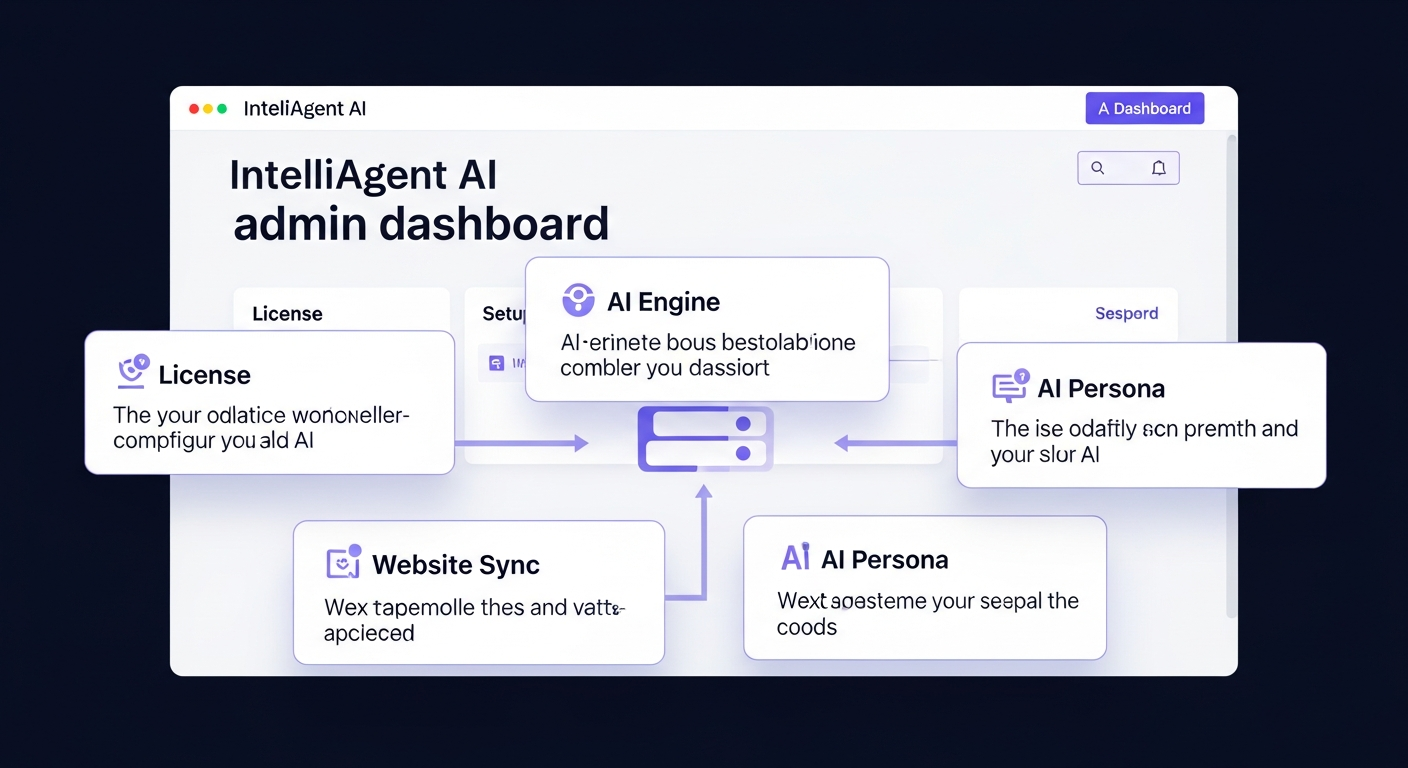
Step 3: Website & WooCommerce Sync
The Website Sync tab is the heart of your AI agent’s knowledge base. This is where the plugin scans your entire website ecosystem to learn what to say. The process is designed to be fully automated, creating a comprehensive and self-updating knowledge source.
During the sync process, IntelliAgent AI automatically imports and tokenizes key content from your site. This includes:
- WooCommerce Products: Full integration with WooCommerce allows the AI to learn your entire product catalog, including descriptions, pricing, and inventory. This enables it to provide accurate product recommendations, assist with purchases, and help customers with order tracking.
- Pages and Blog Posts: All your published pages and posts are indexed, allowing the agent to answer questions based on your company information, services, and articles.
To ensure the knowledge base remains current, the plugin uses WP-Cron to schedule regular, automated syncs. This keeps your product inventory and site content updated daily without requiring manual intervention, ensuring your AI is always sales-ready.
Step 4: Defining Your AI Persona
Once your agent has access to knowledge, the final setup step is to give it a personality and a clear set of instructions. This is managed in the AI Persona tab through the system prompt. The system prompt defines how your AI agent behaves, its tone of voice, and its primary objectives, such as selling products or providing support.
A key feature in version 1.6 is the ability to automate this process. Instead of writing a complex prompt from scratch, you can use the “Auto-Generate from Website Content” button. This powerful tool analyzes your synced website data and automatically drafts a custom persona that understands your specific brand voice, product line, and target audience. This creates a highly relevant and effective sales and support assistant right out of the box.
Advanced Customization and Training
Beyond the initial four-step setup, IntelliAgent AI offers a suite of tools to further refine and customize your agent’s performance and appearance.
Visual Appearance & Branding
The Visual Appearance tab gives you full control over the look and feel of the chat interface. A live preview sidebar in the admin panel allows you to see your changes instantly. You can configure light and dark modes, upload custom avatars for your agent, and set primary brand colors to ensure the chat widget perfectly matches your site’s design.
Specialized Knowledge with Document Training
Sometimes, crucial information isn’t available on your public-facing pages. The Document Training feature allows you to upload specialized files like product manuals, technical specifications, or internal policy documents in PDF or TXT format. The AI ingests this data to provide deeper, more specific answers to customer questions.
Feedback, Training, and FAQ Management
Continuous improvement is built into IntelliAgent AI. The Feedback & AI Training dashboard allows you to review visitor conversations and correct any unhelpful or inaccurate AI responses. This feedback loop helps “train” the agent, improving its accuracy over time.
Furthermore, the FAQ Management section lets you build a verified database of answers to common questions about shipping, refunds, or store policies. The AI prioritizes this data, ensuring 100% accuracy on critical business information.
Key Settings Summary Table
This table provides a quick overview of the main configuration tabs in IntelliAgent AI and their primary purpose.
| Setting Tab | Primary Function |
|---|---|
| License | Activates Pro features and enables the core AI engine. |
| AI Engine | Connects to third-party LLMs like OpenAI, Gemini, or Grok. |
| Website Sync | Builds the AI’s knowledge base from pages, posts, and WooCommerce products. |
| AI Persona | Defines the AI’s personality, tone, and operational instructions. |
| Visual Appearance | Customizes the chat widget’s colors, theme, and avatar to match your brand. |
| Document Training | Uploads PDFs and TXT files for specialized knowledge. |
| FAQ Management | Creates a database of verified answers for critical questions. |
Frequently Asked Questions
What AI models does IntelliAgent AI support?
IntelliAgent AI supports multiple leading AI models to provide flexibility and future-proofing. You can choose to connect with models from OpenAI (like GPT-4), Google Gemini, and Grok (xAI). This allows you to select the best provider based on your performance needs and budget.
How does IntelliAgent AI learn about my products?
The plugin features a “Website Sync” function that automatically scans your entire WordPress site. If you have WooCommerce installed, it will import and tokenize all your product data, including names, descriptions, and prices. This information forms the core of its knowledge base, enabling it to make intelligent product recommendations.
Do I need WooCommerce to use this plugin?
No, WooCommerce is not required. IntelliAgent AI is compatible with any WordPress site. For non-eCommerce sites, the agent focuses exclusively on indexing your pages, posts, and uploaded documents to build a content-driven knowledge base for general support and lead generation.
How do I customize the chatbot’s appearance?
You can fully customize the chatbot’s look and feel from the “Visual Appearance” tab in the plugin settings. This section includes a live preview sidebar and provides options to change the primary brand colors, switch between light and dark themes, and upload a custom avatar for your AI assistant.
By following this guide, you can effectively set up and deploy a powerful AI assistant on your WordPress site. This tool not only automates customer support but actively works to turn conversations into conversions, providing a significant return on investment.
Ready to turn your website into a fully automated sales and support assistant? Get IntelliAgent AI today and start closing more sales with 24/7 AI intelligence.