Ready to turn your WordPress website into a 24/7 sales and support powerhouse? An AI assistant can transform your customer experience, but the setup process can seem intimidating. This guide breaks down the complete IntelliAgent AI setup into simple, actionable steps, helping you launch a fully functional AI agent that recommends products, resolves questions, and drives revenue automatically.
We will walk you through everything from activating your license to training your AI’s unique brand persona. By following this tutorial, you’ll configure IntelliAgent AI to work seamlessly with your content and, if you have one, your WooCommerce store, creating a digital employee that’s always ready to help.
Table of Contents
- Before You Begin: Your 3-Step Preparation Checklist
- Step 1: How to Activate Your IntelliAgent AI License
- Step 2: How to Connect Your AI Engine (OpenAI, Gemini, or Grok)
- Step 3: How Does IntelliAgent AI Learn About Your Products?
- Step 4: How to Create an AI Persona That Matches Your Brand
- Step 5: How to Customize the Chatbot’s Visual Appearance
- Step 6: What is Advanced Document Training?
- Step 7: How to Configure Notifications and Ongoing Training
- Frequently Asked Questions
Before You Begin: Your 3-Step Preparation Checklist
A successful IntelliAgent AI setup starts with having the right elements in place. Before you install the plugin, ensure you have these three items ready to go. This preparation will make the configuration process smooth and fast.
- Your IntelliAgent AI License Key: After purchasing, you will receive a license key. This key unlocks the plugin’s professional features and enables communication with the AI models.
- An API Key from an AI Provider: IntelliAgent AI is flexible, supporting models from OpenAI, Google Gemini, and Grok. You’ll need an active API key from your chosen provider.
- An Active WordPress Site: The plugin is designed for WordPress. For e-commerce features, you must have WooCommerce installed and active with products already listed.
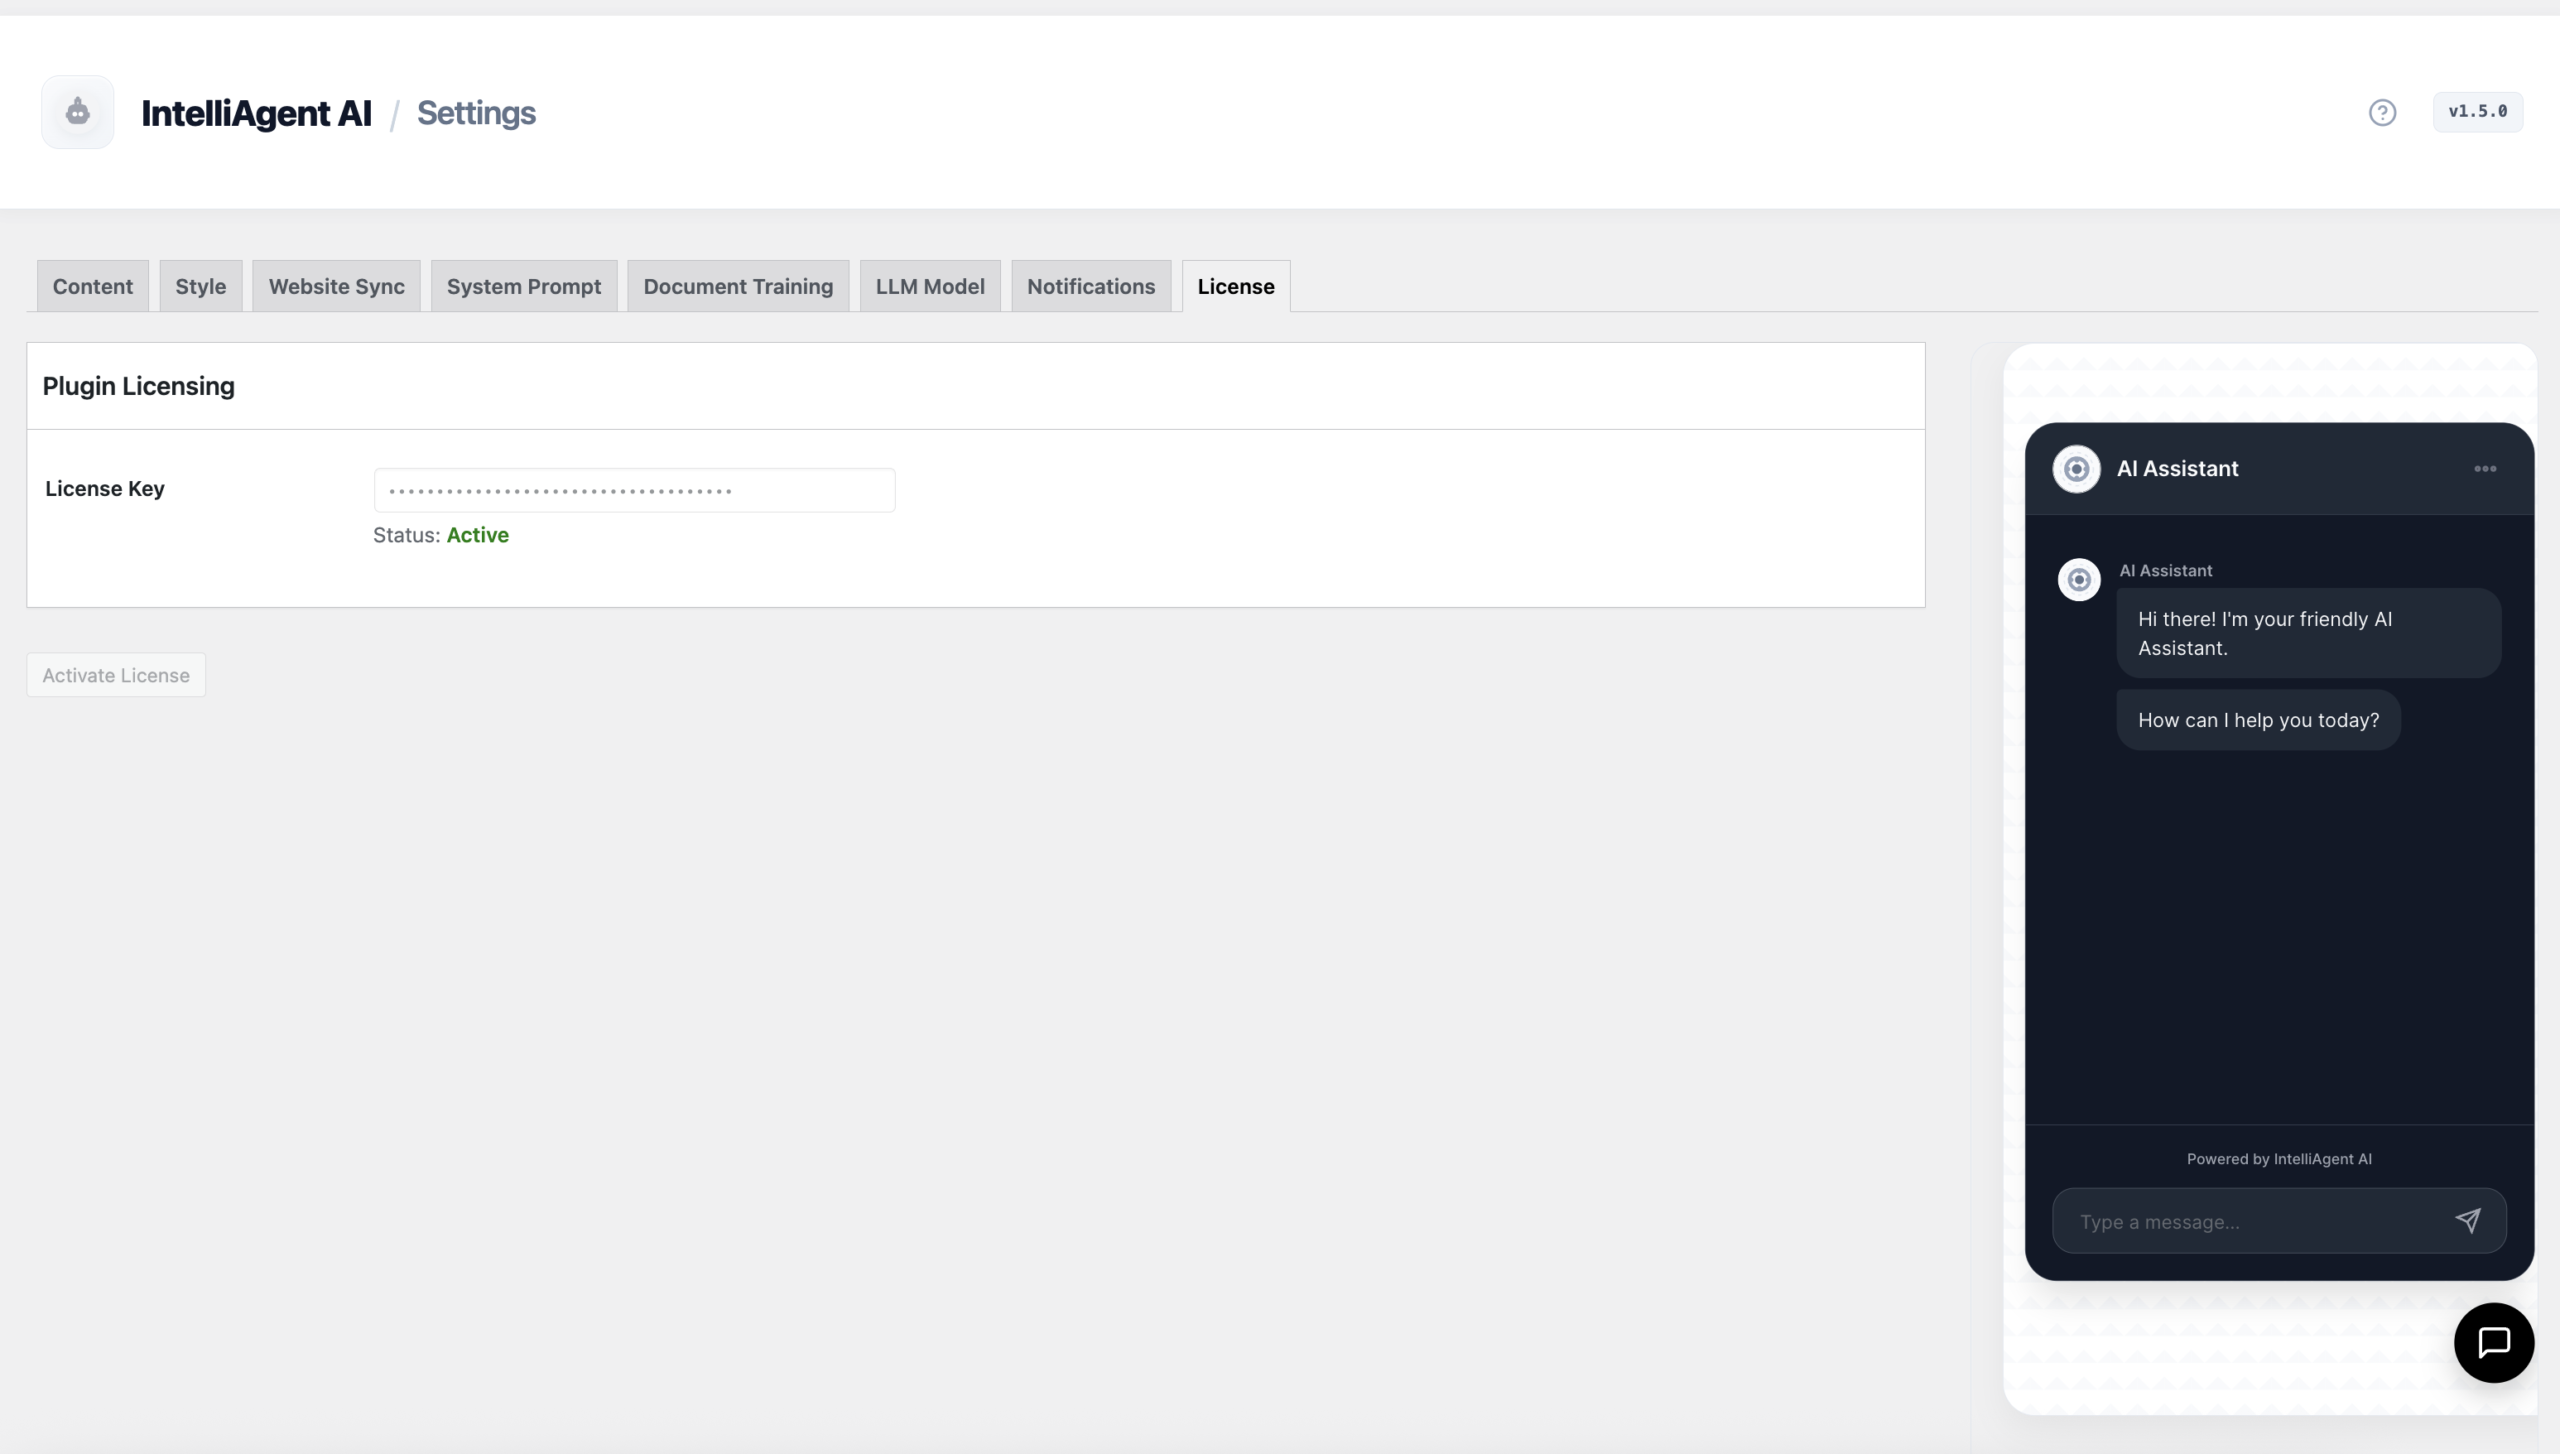
Step 1: How to Activate Your IntelliAgent AI License
The first step is to authenticate your plugin, which enables the core intelligence engine. Navigate to the IntelliAgent AI → License tab in your WordPress dashboard. This is where you will verify your purchase and unlock all features.
Paste your license key into the designated field and click Activate License. The system will validate your key, and upon success, the status will change to “Active.” This confirmation means your site is now ready to connect to a large language model (LLM).
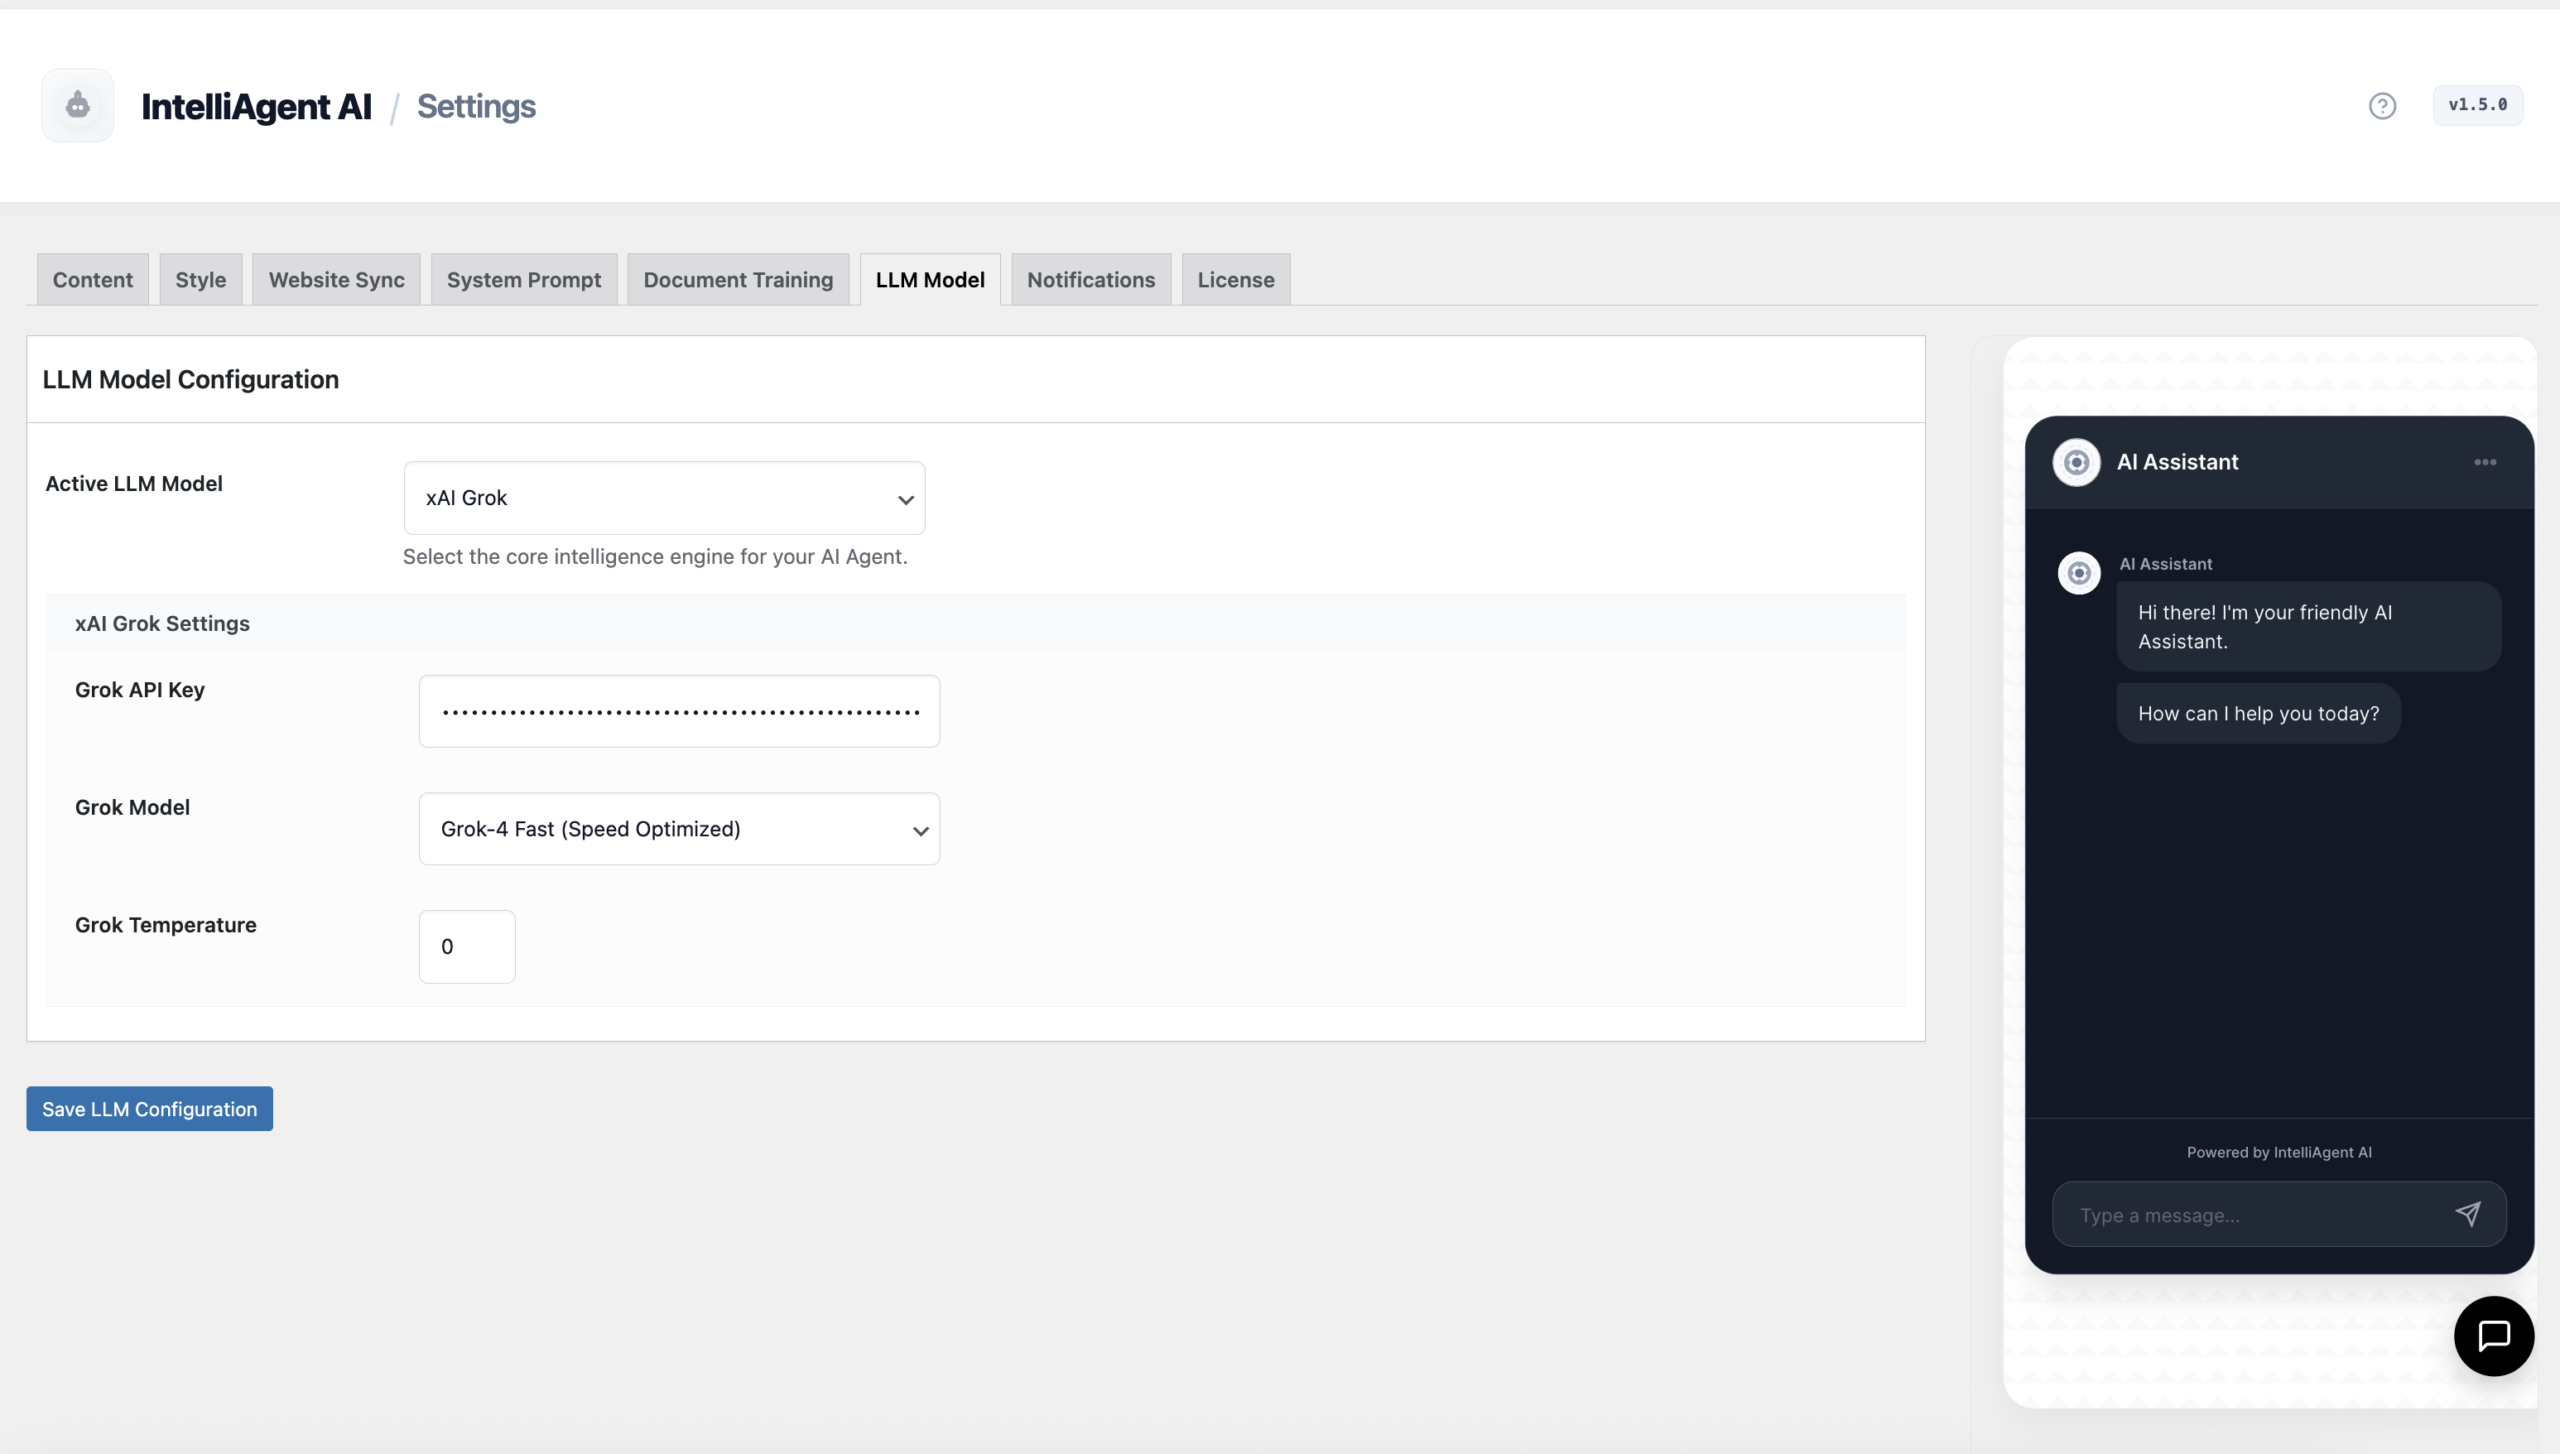
Step 2: How to Connect Your AI Engine (OpenAI, Gemini, or Grok)
With your license active, it’s time to connect to an AI brain. In the AI Engine tab, you can choose your preferred AI provider. IntelliAgent AI’s multi-model support for Grok, OpenAI, and Gemini gives you the flexibility to balance cost, speed, and performance to fit your business needs.
Select your provider from the dropdown menu and enter your corresponding API key into the secure field. Version 1.6 supports the latest flagship models, enabling advanced sales reasoning and conversational logic directly on your site.
Choosing Your AI Engine
Not sure which model to choose? Each has unique strengths. This table provides a quick comparison to help you decide.
| Model Family | Best For… | Potential Cost | Key Characteristic |
|---|---|---|---|
| OpenAI (GPT series) | Creative conversations, complex problem-solving, and generating human-like text. | Pay-per-use, varies by model. | High-quality reasoning and versatility. |
| Google Gemini | Multimodal tasks, strong factual grounding, and integration with Google’s ecosystem. | Often includes a generous free tier, then pay-per-use. | Speed and accuracy for data-driven answers. |
| Grok (xAI) | Real-time information access and a more direct, sometimes humorous, personality. | Pay-per-use, pricing is competitive. | Access to current events and unique conversational style. |
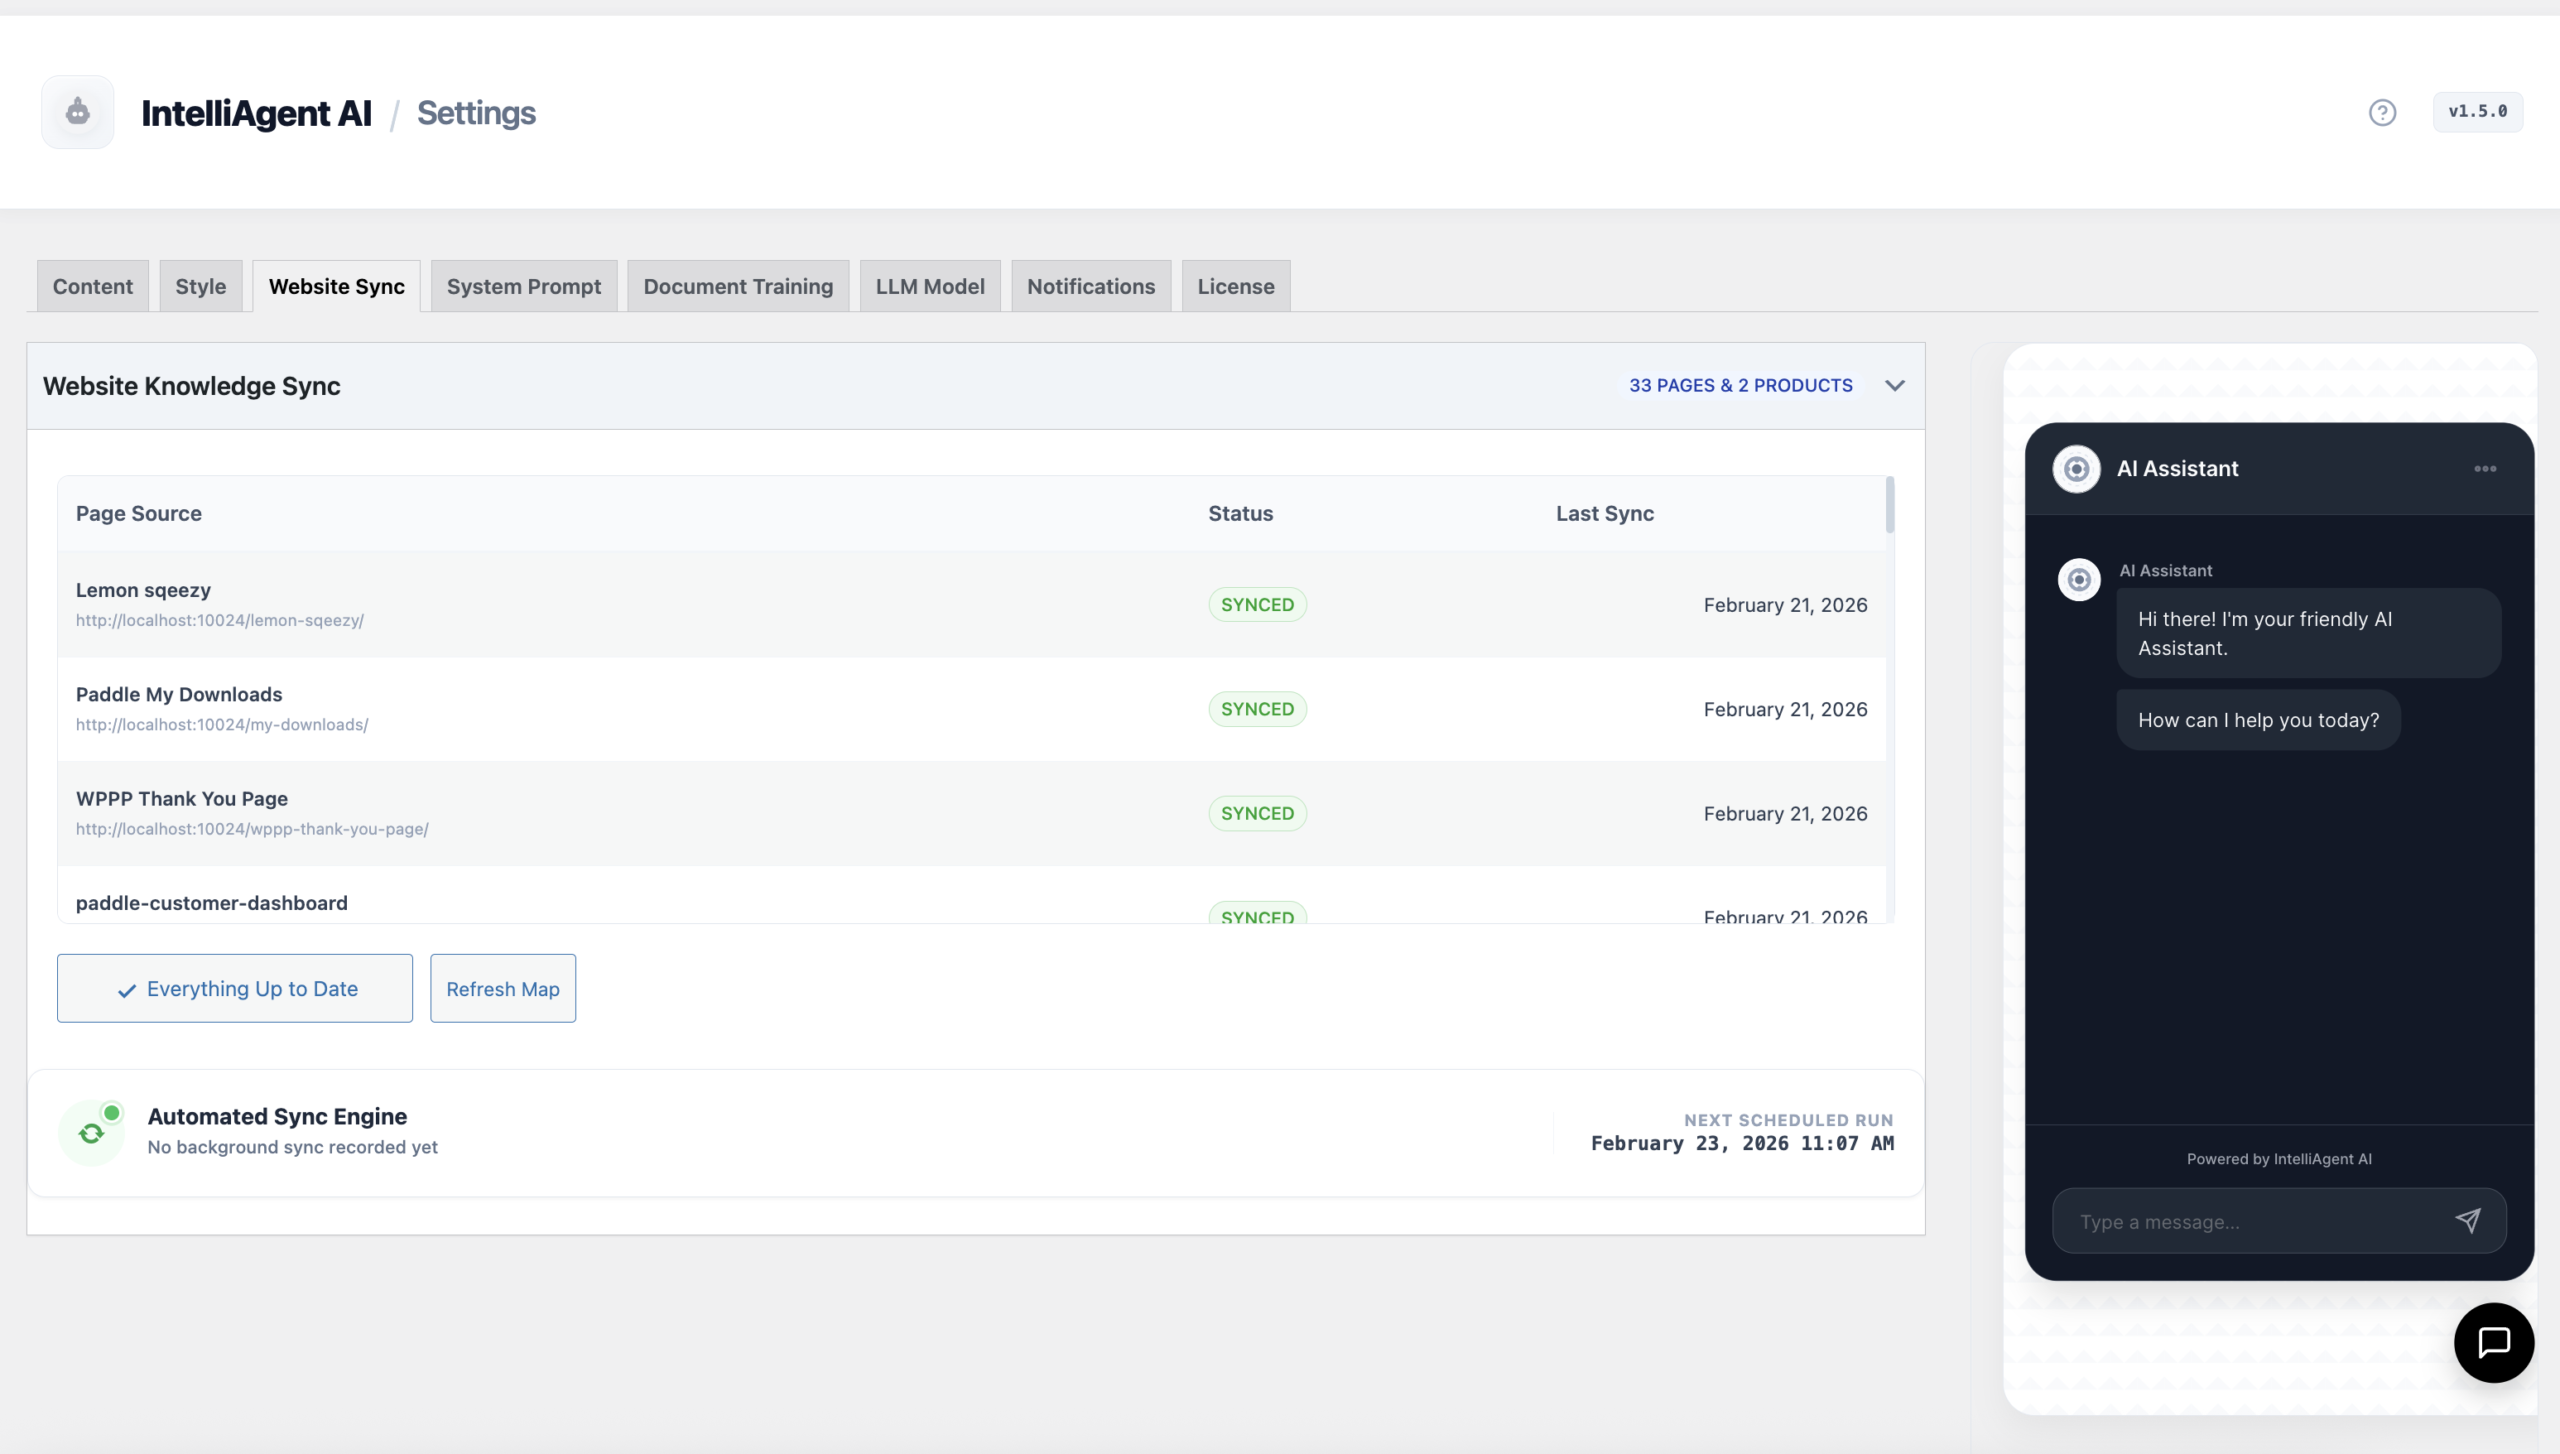
Step 3: How Does IntelliAgent AI Learn About Your Products?
An AI agent is only as smart as its knowledge base. The Website Sync tab is where your AI learns about your business. This feature automatically scans your entire WordPress site—including pages, blog posts, and most importantly, your WooCommerce products.
By clicking “Sync Now,” you initiate the first import, which tokenizes your content and makes it accessible to the AI. This process is what allows the agent to provide accurate product recommendations, check inventory details, and even assist with order tracking. To ensure the information is always current, IntelliAgent AI uses WP-Cron to perform an automatic sync daily.
Step 4: How to Create an AI Persona That Matches Your Brand
Your AI agent shouldn’t sound like a generic robot. The AI Persona tab allows you to define its personality, tone, and communication style, ensuring it aligns perfectly with your brand voice. This is crucial for building trust and rapport with customers.
For a quick and effective start, use the “Auto-Generate from Website Content” button. This powerful feature analyzes your synced site data to draft a custom persona that understands your specific product line and target audience. You can then refine the generated prompt to further instruct the AI on how to act as your ideal sales representative.
Expert Insight: When refining your AI persona, be specific. Instead of just saying “be helpful,” try instructions like: “You are a friendly and expert botanist for our online plant store. Always recommend a potting mix when a customer asks about a specific plant. Keep your tone encouraging and educational.” This level of detail dramatically improves sales-assist performance.
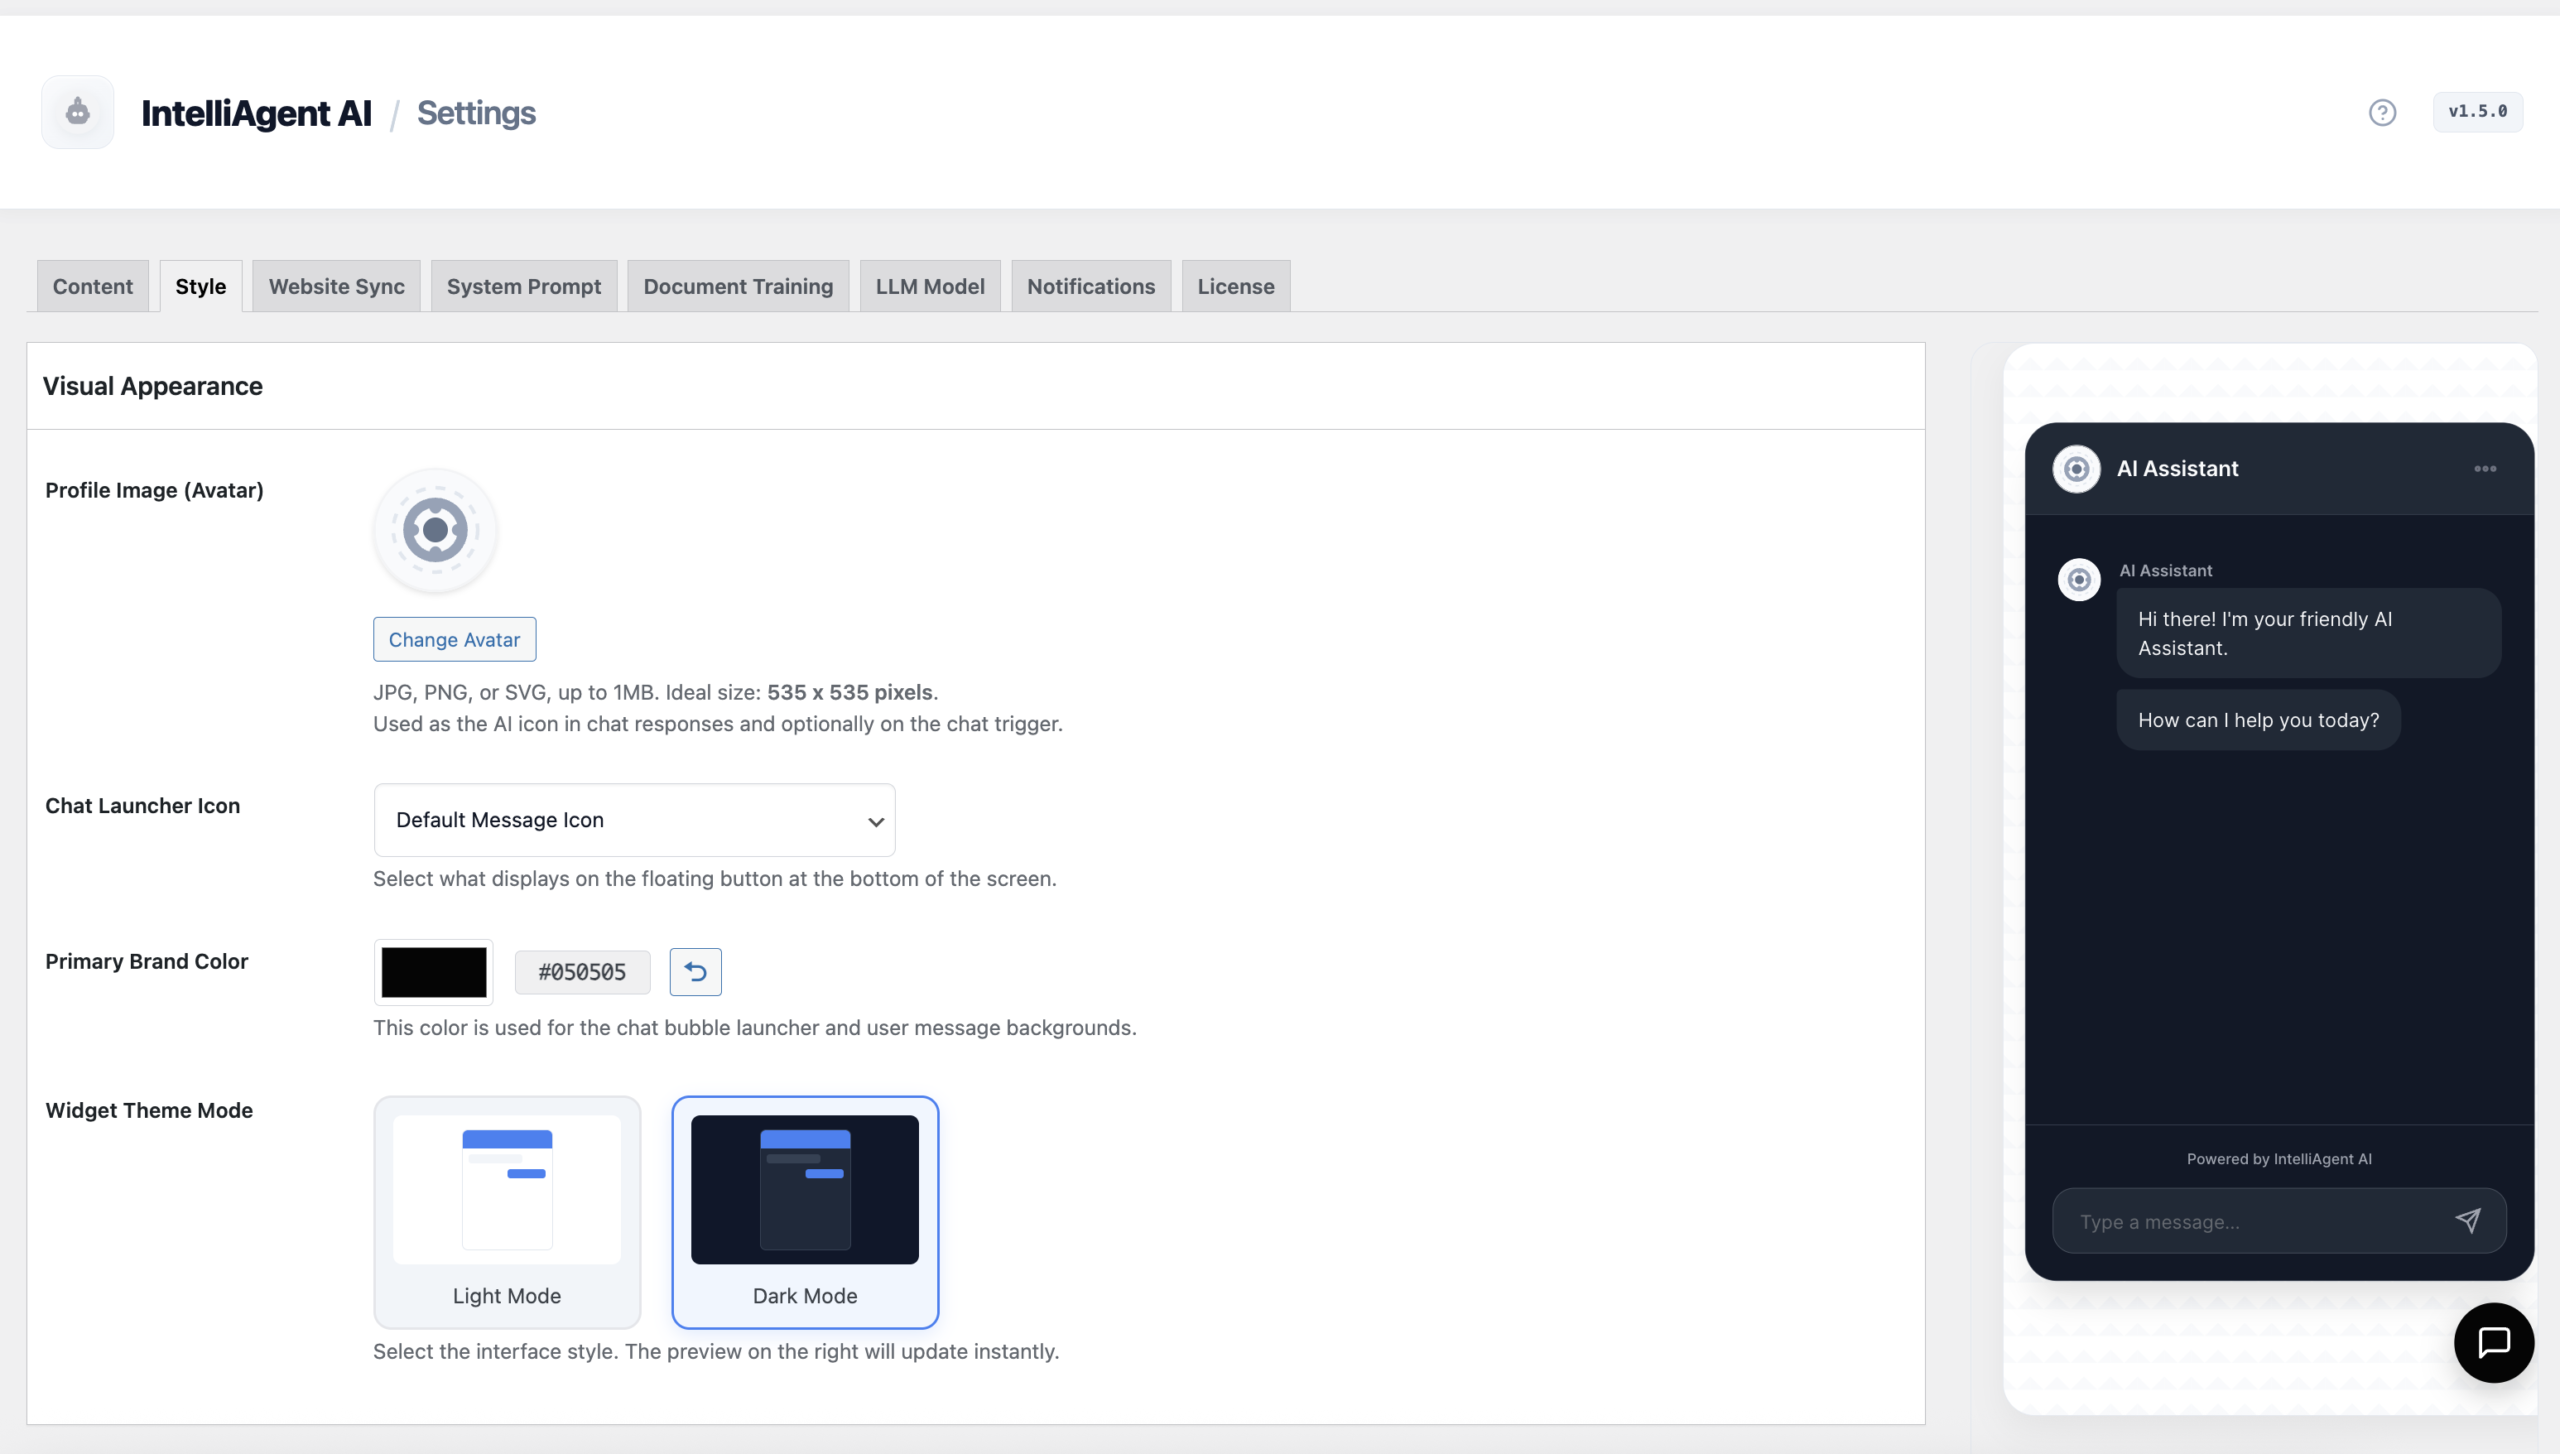
Step 5: How to Customize the Chatbot’s Visual Appearance
A seamless user experience requires the chat interface to match your website’s design. In the Visual Appearance tab, you can customize every aspect of the chat widget. The live preview sidebar shows your changes in real-time, so you can experiment until it’s perfect.
Key customization options include:
- Theme Modes: Choose between light and dark modes to match your site’s aesthetic.
- Branding: Upload a custom avatar for your agent and set the primary brand color for chat bubbles and icons.
- Interface Text: Change the agent’s display name and the initial placeholder text to welcome visitors.
Step 6: What is Advanced Document Training?
Sometimes, crucial information isn’t available on your public website pages. The Document Training feature allows you to supplement the AI’s knowledge base by uploading specialized files. This is ideal for product manuals, technical specifications, internal price lists, or detailed return policies.
Simply upload supported files like PDFs or TXT documents. IntelliAgent AI will parse this information and add it to the knowledge base, giving your agent a deeper level of expertise to handle more specific and technical customer queries without needing human intervention.
Step 7: How to Configure Notifications and Ongoing Training
The final step in your IntelliAgent AI setup is to establish a feedback loop. Go to the Notifications tab and enter an admin email address. This ensures you receive alerts and conversation summaries when the AI captures a lead or handles a complex support query, keeping you in the loop.
Next, familiarize yourself with the Feedback & AI Training and FAQ Management tabs. In the Feedback section, you can review conversations and correct any unhelpful AI responses, effectively training your “digital employee” over time. The FAQ Management system lets you create a verified database of answers for common questions about shipping, returns, or store policies, which the AI will prioritize for 100% accuracy.
Frequently Asked Questions
Can IntelliAgent AI access my order information to track shipments?
Yes. Through its deep integration with WooCommerce, IntelliAgent AI can assist logged-in customers with tracking their order status directly within the chat interface, providing a seamless post-purchase support experience.
How many languages does IntelliAgent AI support?
IntelliAgent AI supports over 40 languages out of the box. It can automatically detect the visitor’s language and conduct conversations multilingually without requiring any additional translation plugins, making it perfect for global e-commerce stores.
Will installing IntelliAgent AI slow down my website?
No. The plugin is optimized for performance. It uses WP-Cron for background syncing processes, which keeps your server load low and ensures your site speed remains high for all visitors.
What happens if the AI doesn’t know the answer to a question?
If the AI cannot find a relevant answer within its knowledge base (your website content, documents, and FAQs), it will politely inform the user it cannot help with that specific query. You can configure the AI persona to then suggest contacting human support or asking a different question.
Is my data secure when using an API key from OpenAI or Gemini?
Yes. Your API keys are stored securely in your WordPress database. All chat data and indexed content remain on your local server; IntelliAgent AI does not host or share your data. Communication with third-party AI providers is handled securely.
You have now completed the core IntelliAgent AI setup. Your AI sales and support agent is live and ready to engage with visitors, answer questions, and guide them toward a purchase. By transforming your website content into an interactive and intelligent resource, you can stop losing leads and start automating your growth.
Take the next step in e-commerce automation. Explore our lifetime access plans and give your website the 24/7 sales intelligence it deserves.