
WordPress AI assistant plugin installation steps with IntelliAgent AI provide site owners a direct path to deploy a private AI knowledge base that powers accurate automated sales and support responses using only existing WordPress and WooCommerce content. Following these steps creates a secure, site-specific AI assistant capable of handling product recommendations, order tracking, and multilingual interactions without relying on external data sources.
Table of Contents
- WordPress AI Assistant Plugin Overview
- Prerequisites for IntelliAgent AI Installation
- Dashboard Installation Steps
- License Activation Process
- Knowledge Base Training and Initial Scan
- WooCommerce Integration Configuration
- How IntelliAgent AI Differs from Other WordPress AI Plugins
- Frequently Asked Questions
WordPress AI Assistant Plugin Overview
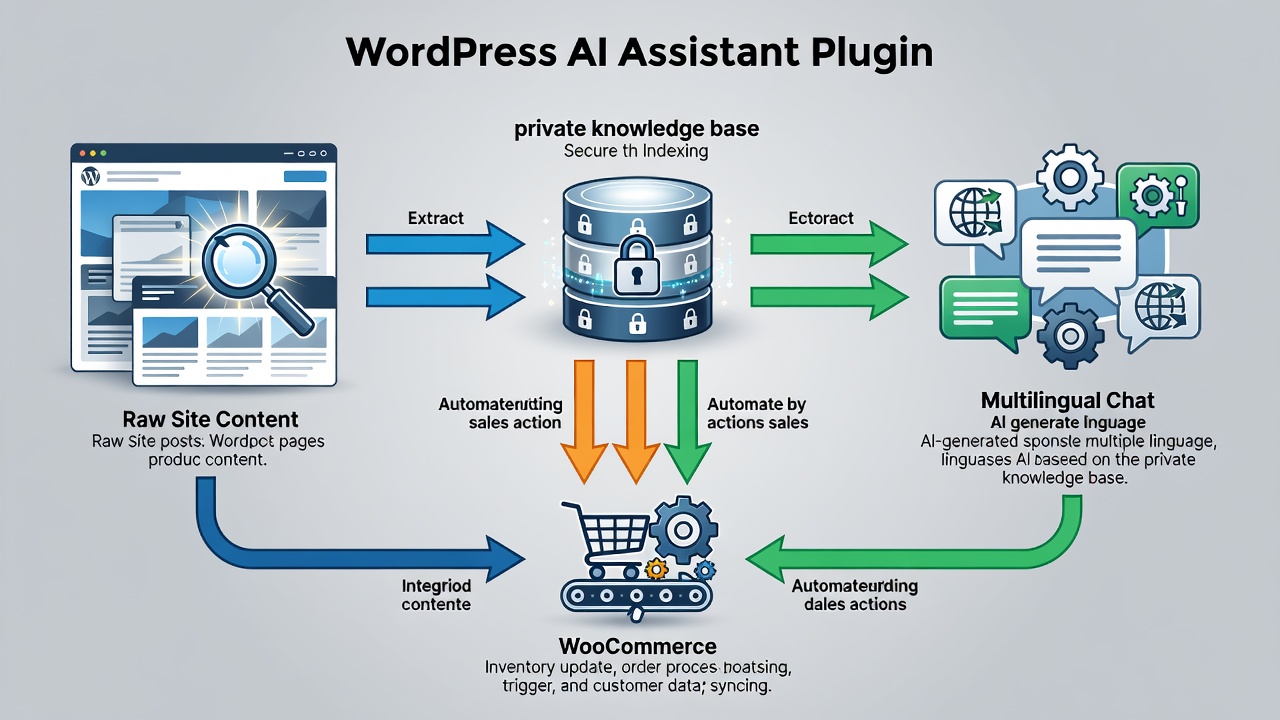
What are the exact WordPress AI assistant plugin installation steps? IntelliAgent AI functions as a complete WordPress AI assistant plugin that scans existing pages, posts, and product data to build a secure private knowledge base. The plugin then uses this knowledge base to deliver accurate answers while executing real WooCommerce actions such as product recommendations and order tracking. In modern SEO practice, this architecture ensures responses remain grounded in the site’s own content rather than generic training data.
Experienced developers often note that the plugin follows WordPress coding standards using hooks, REST API, and AJAX for seamless integration while maintaining security through sanitization and capability checks. The result is a reliable AI layer that converts visitors into customers 24/7. A key strategy to consider during initial planning involves mapping out which content types will form the core of the private knowledge base before installation begins.
Technical SEO supports on-page SEO by improving crawlability, and the same principle applies here where proper plugin setup improves how the AI interprets site structure. Bullet summary of core capabilities: scans published content automatically, executes WooCommerce actions in chat, supports over 40 languages, and runs on WP-Cron to minimize server impact.
Prerequisites for IntelliAgent AI Installation
Before beginning WordPress AI assistant plugin installation steps, confirm your site meets these baseline requirements. A current WordPress installation running version 6.0 or higher is necessary. WooCommerce must be active if sales features are required. Administrator access with capability to install plugins is also essential. In real-world implementations, sites that verify these prerequisites first experience fewer configuration issues and faster time to value.
The following table summarizes the key setup phases and their typical durations according to industry standards.
| Setup Phase | Time Required | Key Actions |
|---|---|---|
| Installation | 2 minutes | Upload ZIP via dashboard and activate |
| License Activation | 1 minute | Enter license key from purchase email |
| Knowledge Base Sync | 3-8 minutes | Run full site scan via plugin settings |
Verifying WordPress Version and Environment
Check the WordPress version through the dashboard under Tools > Site Health. Sites running older versions must update first to ensure compatibility with modern plugin architecture. A common mistake businesses make is overlooking plugin conflicts with existing caching or security tools that can block background indexing.
Preparing WooCommerce for AI Actions
Enable WooCommerce if product recommendations and order tracking are required. Test basic store functions such as product display and cart operations before plugin activation. This preparation prevents issues where the AI attempts actions on incomplete store data.
Dashboard Installation Steps
Complete WordPress AI assistant plugin installation steps follow a straightforward sequence that any site administrator can execute without custom coding. Log in to the WordPress admin area and navigate to Plugins > Add New. Upload the IntelliAgent AI plugin ZIP file and click Activate. The plugin immediately appears in the left menu under IntelliAgent AI.
Numbered installation sequence: 1. Download the plugin ZIP from your purchase confirmation. 2. Access the Plugins screen in WordPress. 3. Select Upload Plugin and choose the file. 4. Activate immediately after upload completes. According to industry standards, following each phase sequentially prevents common configuration errors and ensures the private knowledge base remains accurate.
Troubleshooting Upload Errors
Typical error messages include file size limits or permission issues. Increase the upload_max_filesize value in php.ini or contact your host if the ZIP exceeds server restrictions. Experienced developers often resolve these by temporarily disabling security plugins during upload.
License Activation Process
Enter the lifetime license key obtained during purchase inside the plugin settings screen. Activation unlocks unlimited sites and removes any trial limitations. In modern business practice, lifetime licensing eliminates recurring costs and provides long-term ownership of the AI sales and support engine.
After entering the key, save settings and verify the status indicator shows active. A common mistake businesses make is skipping the activation step, which leaves the plugin non-functional until manually enabled. Once activated, the plugin is ready for the next phase of configuration without additional payments or renewals.
Handling License Errors
If the key fails to validate, confirm it matches the exact purchase email and check for extra spaces. Contact support@aica-intelliagent.com with your order details for quick resolution. This step ensures full access to all features including background WP-Cron indexing.
Knowledge Base Training and Initial Scan
Trigger the initial content scan from the Knowledge Base tab. IntelliAgent AI indexes all published pages, posts, and WooCommerce products using WP-Cron background processing to keep server load minimal. This background approach ensures the site remains responsive during indexing.
The initial scan typically completes within a few minutes depending on site size and number of published items. Larger sites with extensive product catalogs may require slightly more time due to background WP-Cron processing. Bullet summary of what gets indexed: all published pages and posts, product titles and descriptions, category and tag data, and custom post types if enabled.
Optimizing Scan Performance
Run the scan during low-traffic periods to avoid any temporary slowdowns. Monitor server resources through your hosting dashboard. A key strategy to consider involves excluding draft or private content from the scan to keep the private knowledge base focused and accurate.
WooCommerce Integration Configuration
WooCommerce integration turns the WordPress AI assistant plugin into a revenue-generating tool. Enable product recommendations, add-to-cart commands, and real-time order status lookup directly inside the chat window. No additional plugins or custom code are required.
The result is faster support, automated FAQ management, and clearer insight into what visitors actually care about while serving a global audience with 40+ language support. Define WooCommerce actions clearly on first mention: these are direct commands the AI can trigger such as adding items to cart or retrieving order status without leaving the chat interface.
Testing AI-Driven Sales Actions
After configuration, test sample queries such as product suggestions or order lookups in a staging environment. Verify that responses include accurate data pulled from the private knowledge base. This testing confirms the relationship between the indexed content and live WooCommerce functionality.
How IntelliAgent AI Differs from Other WordPress AI Plugins
IntelliAgent AI stands apart by creating a fully private knowledge base that never sends site content to third-party AI providers. Other plugins often rely on public APIs that can expose data or produce generic answers. The plugin executes real WooCommerce actions inside the chat window, a capability not matched by most competitors that only provide text responses.
Technical relationships include tight integration with WP-Cron for scheduled indexing and use of the REST API for real-time chat handling. In real-world implementations, this results in lower latency and higher accuracy for e-commerce queries compared to plugins that depend on external models.
Frequently Asked Questions
How long does the initial knowledge base scan take? The initial scan typically completes within a few minutes depending on site size and number of published items. Larger sites with extensive product catalogs may require slightly more time due to background WP-Cron processing.
Can I use IntelliAgent AI on a staging site first? Yes, you can install and test IntelliAgent AI on staging environments before going live with full confidence. This approach allows verification of knowledge base accuracy and WooCommerce actions without impacting production traffic.
What happens if the scan encounters permission errors? Permission errors during scanning usually stem from restricted post types or security plugin interference. Review capability settings and temporarily adjust security rules to allow full indexing of published content.
Does the plugin support custom post types beyond standard pages and products? Yes, IntelliAgent AI can index custom post types when they are marked as public, expanding the private knowledge base to include specialized content such as portfolio items or knowledge base articles.
Ready to automate your support and sales? Activate IntelliAgent AI now with lifetime access and start converting visitors into customers 24/7.